
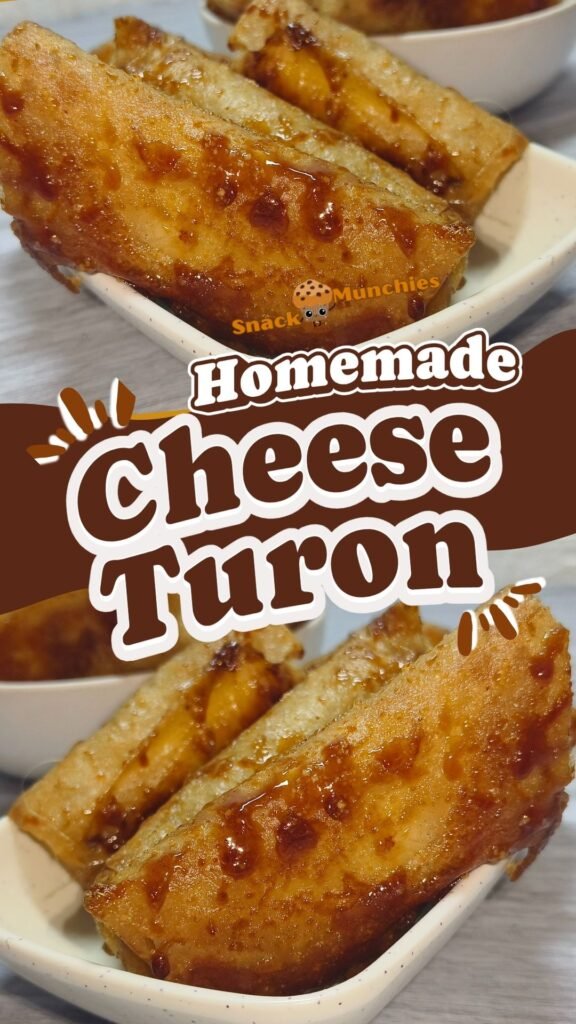
There’s just something about a rainy afternoon that makes me crave comfort snacks. Not fancy desserts. Not complicated recipes. Just something warm, crispy, sweet, and a little bit unexpected. That’s exactly how this Cheese Turon happened.
I remember the first time I had a turon with cheese tucked inside—my mind was blown a little. Like, how did nobody tell me bananas and melty cheese could be this good together? It’s one of those combos that sounds weird if you haven’t tried it… but once you do, you’ll wonder where it’s been all your life.
This version is sweet, a little savory, super crispy, and honestly kinda addictive. It’s the kind of snack you make “just a few” of… and somehow end up eating way more than planned. Happens every time around here.
Why You’ll Love This Cheese Turon Recipe
Quick and easy – Only takes about 20 minutes from start to finish.
Sweet and salty perfection – Melty cheese balances the caramelized banana just right.
Ultimate crunch – Lumpia wrappers fry up shatteringly crisp.
Fun and a little different – A cool twist if you’re bored with regular desserts.
Party favorite – These disappear fast at potlucks and family get-togethers.
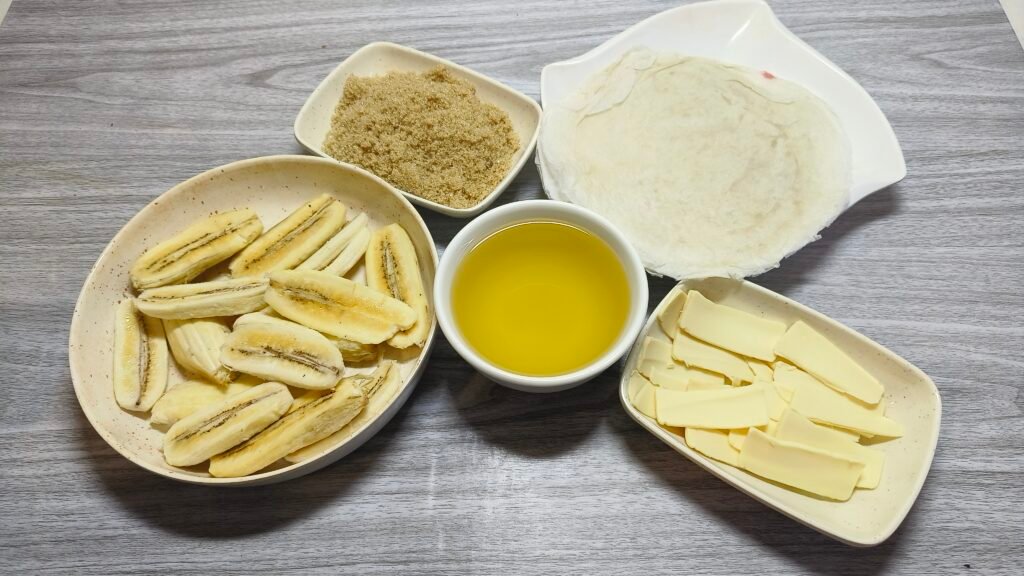
Ingredients For Your Cheese Turon
Bananas
- 6 ripe saba bananas – The best choice because they hold their shape when cooked and have a mellow sweetness.
Cheese
- 6 slices cheddar or quick-melt cheese – You want that salty, creamy hit when you bite in. Quick-melt gives you that ooey-gooey pull, but cheddar’s got the stronger flavor punch.
Brown Sugar
- ½ cup brown sugar – Sweet, caramel goodness for the banana and a little crunch when fried.
Lumpia Wrappers
- 12 wrappers – Super thin, light, and perfect for a mega-crispy finish. Always good to have extras in case one tears.
Oil
- 1 cup vegetable or canola oil – Neutral flavor, high-heat ready. Perfect for getting that golden color without weird flavors.
Instructions (aka How I Make Magic Happen)
1. Coat the Bananas
Slice your saba bananas in half lengthwise first. Roll each piece in brown sugar till they’re nicely coated. It’ll feel a little messy, but that’s part of the fun.
2. Assemble the Cheese Turon
Lay a lumpia wrapper in front of you like a diamond. Put one banana slice near the bottom, and top it with a strip of cheese. Don’t overthink it—simple is good.
3. Wrap and Seal
Fold the bottom up over the filling, tuck in the sides (like a burrito), and keep rolling it tight. Dab a little water or oil on the edge to seal it closed. If the wrapper rips, double wrap it—you’ll thank yourself later.
4. Fry Until Crispy and Golden
Heat up the oil over medium heat. (Not too hot—you want golden, not burnt.) I sometimes sprinkle a little brown sugar right into the oil for that extra caramel crunch.
Fry the turon in batches, turning them so all sides crisp up nice and even. Should take about 2–3 minutes per batch.
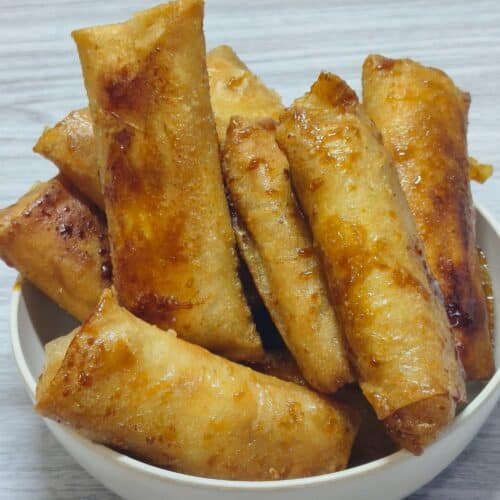
5. Drain and Serve
Take ’em out and lay them on paper towels to soak up the extra oil. Serve them warm—because gooey cheese and crispy wrappers wait for no one.

Cooking Tips & Techniques
If you’re using quick-melt cheese, keep an eye while frying—if the cheese tries to escape, your oil can get messy real quick. That’s why double-wrapping is a good move if you’re feeling cautious.
Don’t rush the frying either. Medium heat lets the sugar inside melt and caramelize without the wrapper burning before you’re ready. I learned that the messy way once—still delicious, but not as pretty.
Also: when you sprinkle brown sugar into the oil, stand back a little. It sizzles fast, but that extra caramel crunch is so worth it.
Recommended Equipment
Honestly, you don’t need anything wild for this recipe. Just good basics:
- A decent frying pan – Big enough to hold a few turon rolls at a time.
- Tongs – Makes flipping easy without breaking the wrapper.
- Paper towels – Can’t skip this step if you want that crispy crunch to last.
- Small bowl for sealing – A little water or oil in a bowl makes sealing way easier.
My go-to tools
- Non-Stick Frying Pan
- Heat-Resistant Tongs
How to Serve Your Cheese Turon
Serve these hot, fresh from the pan. That’s when the cheese is still melty and the wrapper’s crackly perfect. I love serving them on a big platter with maybe a lil’ drizzle of condensed milk on the side. You could even sprinkle powdered sugar if you wanna get fancy.
Cheese Turon also makes a fun after-dinner treat when you’re not really in the mood for a big heavy dessert but still want something a little special.
Diet-Friendly Options
- Vegan Version – Swap regular cheese for a vegan quick-melt cheese. (Some taste really close!)
- Low Sugar – Lightly coat the bananas instead of rolling them if you wanna cut down a bit.
- Baked Option – You can bake them at 400°F until crispy if you’re avoiding deep frying. They’ll still get golden, just not quite as caramelized.
Best Ways to Store
If you somehow have leftovers (props to you if you do), let the rolls cool completely, then store in an airtight container in the fridge. They’ll keep for about 2–3 days.
When you’re ready to eat, reheat in a toaster oven or air fryer if you’ve got one. The oven’s fine too—just avoid microwaving, or the wrappers go weirdly soggy and chewy. (Not ideal.)
Recipe Variations
- Jackfruit Cheese Turon – Layer a piece of jackfruit with the banana and cheese for a fruity, tropical twist.
- Ube Cheese Turon – Add a small scoop of ube halaya (purple yam jam) with the filling for a colorful surprise.
- Nutella Cheese Turon – Smear a little Nutella with the banana and cheese… total indulgence, but no regrets.
- Mini Cheese Turon – Cut everything smaller and make bite-sized versions. Perfect for party trays.
Or maybe just Traditional Simple Banana Lumpia (Turon)
Once you’ve mastered the basic wrap and fry, honestly you can fill these with so many things.

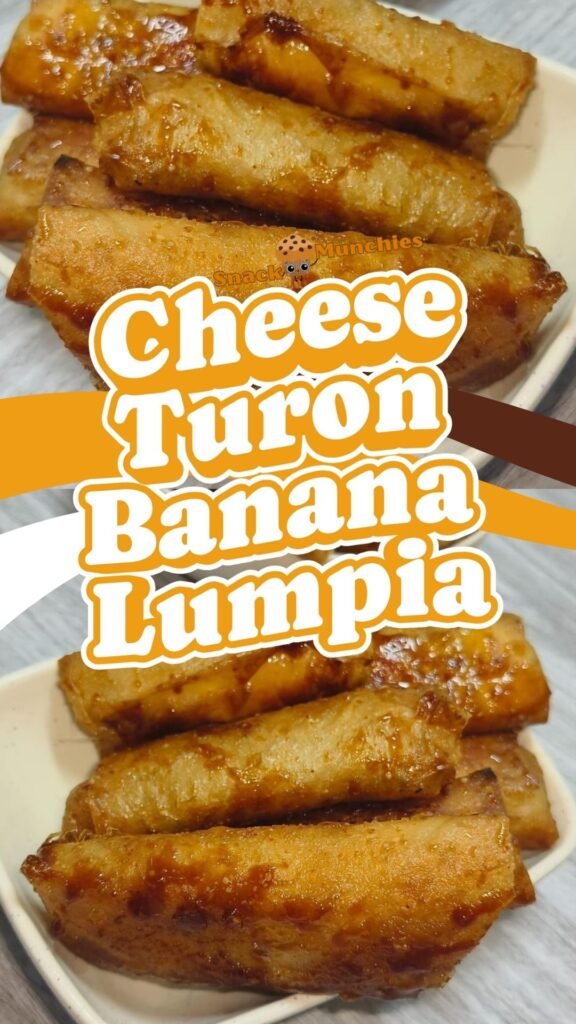
Making Cheese Turon feels like one of those little joys that doesn’t take a ton of effort but pays off big. It’s simple, it’s nostalgic, and it’s just a little different from your usual sweets. Every bite’s got that crunchy outside, creamy inside, sweet and salty magic that you honestly don’t get from anything else.
I love recipes like this—the ones that remind me you don’t need a million ingredients to make something crazy good. Just a little banana, a little cheese, and a lotta love.
Hope you give it a shot—and if you do, tell me what you thought! Or better yet, tell me how many you ate before you even got them to the table. (No judgment here.)
Common Questions Answered About Cheese Turon
Can I use regular bananas?
You can, but they’re softer and sweeter, so they’ll cook faster and might not hold up as well.
What’s the best cheese to use?
Quick-melt cheese if you want a stretchy texture, cheddar if you want that bold salty flavor contrast.
Can I make these ahead?
Yes! Wrap them and refrigerate uncooked. Fry fresh for the best crunch.
Can I freeze cheese turon?
Absolutely. Freeze them wrapped but raw. Fry straight from frozen on a slightly lower temp.
Can I fry them without caramelizing the outside?
Of course. Just skip sprinkling sugar into the oil if you want a plainer, less sweet shell.
Cheese Turon (Sweet and Savory Banana Lumpia)
Equipment
- Frying pan
- Frying pan
- small bowl of water or oil
- paper towels
Ingredients
- 6 ripe saba bananas, sliced lengthwise
- 6 slices cheddar or quick-melt cheese, cut into strips
- ½ cup brown sugar
- 12 lumpia wrappers
- 1 cup vegetable or canola oil, for frying
Instructions
- Prepare the BananasSlice each saba banana lengthwise into thin halves. Roll each piece thoroughly in brown sugar until well coated.
- Assemble the RollsPlace a lumpia wrapper on a flat surface in a diamond orientation. Lay one sugared banana slice near the lower edge and top with a strip of cheese.
- Wrap and SealFold the bottom corner over the filling, tuck in the sides snugly, and roll tightly into a cylinder. Dab the edge with a little water or oil to seal. If a wrapper tears, wrap with a second layer.
- Heat the OilWarm the oil in a frying pan over medium heat. For extra caramel crunch, sprinkle a small pinch of brown sugar into the oil just before frying.
- Fry Until GoldenFry the rolls in batches, turning occasionally, until all sides are crisp and golden, about 2 to 3 minutes per batch. Avoid overcrowding the pan.
- Drain and ServeTransfer the turon to paper towels to absorb excess oil. Serve immediately while hot and crisp.
Notes
Pro Tips & Variations
- Saba bananas work best because they stay firm and caramelize beautifully.
- Use quick-melt cheese for a stretchy center or cheddar for a stronger salty contrast.
- Fry over medium heat so the sugar melts properly without burning the wrapper.
- Double-wrap if using very soft cheese to prevent leaking during frying.
- Skip adding sugar to the oil if you prefer a less caramelized exterior.